Cauldron Cookies have been my answer to busy weeknights and weekend gatherings alike. As a chef, I run a bustling kitchen. I love desserts that are fun and easy. Cauldron Cookies capture Halloween magic without long hours at the stove. Cauldron Cookies started as a small experiment. A chocolatey cup holds a bubbling, bright-green frosting, crowned with spooky sprinkles. The result is a playful treat. Kids eagerly decorate it, and adults love its cozy vibe. In this guide, you’ll find a step-by-step plan. Even on a chaotic weeknight, you’ll pull it off. Let’s dive in and brew some treats that feel like a celebration.
Table of Contents
What Makes This Cauldron Cookies Special
I reach for Cauldron Cookies on busy days and party-ready moments in my kitchen. I love desserts that feel magical yet simple for weeknights. I love how Cauldron Cookies blend chocolatey cups with bubbling green frosting, quick to assemble. Kids adore decorating, and I adore how this treats the grown-ups too.
Cauldron Cookies for a quick, cozy moment
I slip this recipe into a busy day like a warm hug. I find the cups bake fast, and the frosting comes together in minutes. I know it brightens a tired evening without stealing time from family.
Family-friendly, shareable fun
Little hands love decorating, and I love watching the big smiles. I set out colors, sprinkles, and goofy toppers; everyone feels like a kitchen wizard.
Why You’ll Love This Cauldron Cookies
I reach for Cauldron Cookies on busy weeknights. They feel like a tiny celebration you can pull off in minutes, even when the house is buzzing.
Cauldron Cookies deliver effortless weeknight magic
These Cauldron Cookies bake fast and need almost no fuss. I can bake a tray while the kids finish homework, or while I brew my coffee.
Foolproof steps for consistent, crowd-pleasing results
The steps are simple and forgiving, giving Cauldron Cookies consistent, crowd-pleasing results every time—no guesswork, just fun.
Ingredients Cauldron Cookies
These ingredients are the backbone of Cauldron Cookies. I keep the list simple and reliable, so you can shop once and bake fast. I love how this setup supports busy weeknights and spontaneous Halloween parties. If you print this, exact quantities sit at the bottom for easy reference.
Core components for Cauldron Cookies
Boxed chocolate cake mix, eggs, oil
- 1 box chocolate cake mix
- 2 large eggs
- ½ cup vegetable oil
Unsalted butter, powdered sugar, milk, vanilla
- 1 cup unsalted butter, softened
- 3–4 cups powdered sugar
- 2–3 tbsp milk
- ½ tsp vanilla extract
Optional add-ins and substitutions
Food coloring, Halloween sprinkles, mini candies
- Green gel food coloring
- Halloween sprinkles or mini candies (optional, for potion bubbles)
Quick prep notes for ingredients
Ingredient sourcing tips and storage tips
- Gel coloring is best for bright, true-green frosting; a few drops go a long way.
- Keep butter soft for easy creaming; store butter in the fridge until ready to use.
- Powdered sugar keeps well in an airtight container; sift if clumps appear.
- Store cake mix in a cool pantry; use within the best-by date for plush texture.
How to Make Cauldron Cookies
Step 1: Preheat and prep
I start by preheating the oven to 350°F. I grease a mini muffin tin well so the cups release cleanly. This tiny step saves a lot of drama on bake day.
Next, I lay out my mise en place: chocolate cake mix, eggs, and oil for the dough. Butter, powdered sugar, milk, and vanilla sit ready for the green frosting. A little gel color and Halloween sprinkles join the party too.
I like to keep the kitchen calm, especially during spooky season. Prep work now means fewer panics later and more giggles with the kids. Cauldron Cookies shine when the setup is simple.
Step 2: Make the dough
In a mixing bowl, I blend the chocolate cake mix with the eggs and oil until a thick dough forms. It should look glossy but sturdy enough to hold its little cup shape. If it’s too soft, I chill it briefly to make scooping easier.
Using a small scoop or a rounded teaspoon, I drop about 1 tablespoon of dough into each muffin cavity. I press down gently and create a shallow well with my thumb. This is the key move that makes our cauldrons possible.
Once all wells are shaped, I pause to admire the fairy-tortured batter. It smells like chocolate and a hint of magic. If the dough sticks a little, I dust my hands with a touch of flour and try again.
Step 3: Bake and deepen wells
The cups bake for 10–12 minutes, until the edges look set and a touch of shine remains in the centers. No overbaking here, or the cups will dry out. Watch for that perfect, soft edge.
As soon as they come out, I press the centers again with the back of a spoon to deepen the wells. The heat makes the dough pliable, so a gentle press works wonders. This creates the hollow space for our bubbling green frosting.
I let the mini cauldrons cool in the tin for a few minutes, then transfer them to a rack. Patience pays off here, so the cups keep their shape. The aroma alone already feels like Halloween magic.
Step 4: Make the green frosting
In a large bowl, I beat the butter until fluffy. Then I gradually add powdered sugar, a splash of milk, and the vanilla, beating until the mixture is smooth and pipeable. This frosting should feel like a sweet, sturdy foam for the bubbling effect.
I tint the frosting with green gel coloring, adding drops until the hue looks bright and true. A little goes a long way, so I stir and peek, aiming for a vivid, almost glowing shade. If I overdo it, a tiny pinch of more powdered sugar can tame the color.
For a smoother finish, I check the frosting’s stiffness. If it’s too loose, I add a pinch more sugar; if too stiff, a splash more milk. This balance helps me pipe clean bubbles without the frosting drooping. Halloween baking ideas love a frosting that pipes nicely.
Step 5: Assemble and decorate
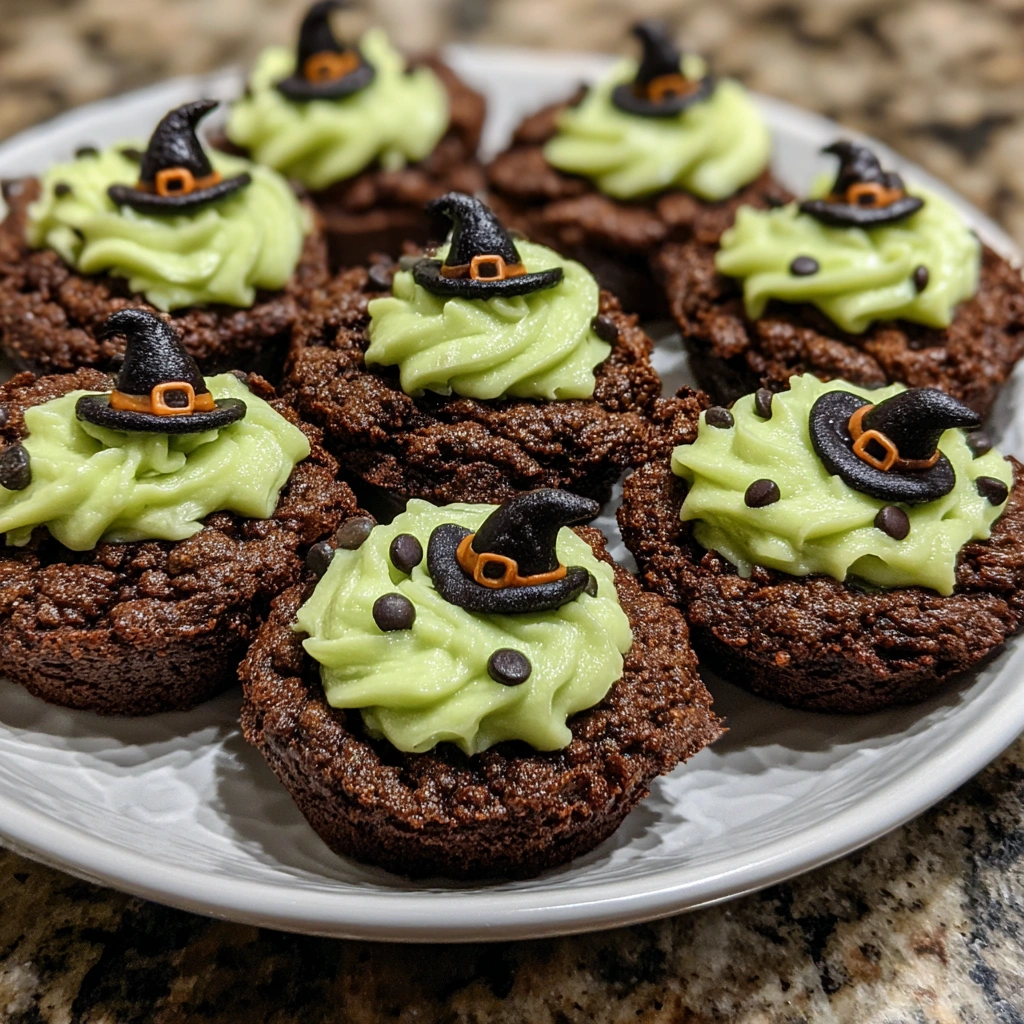
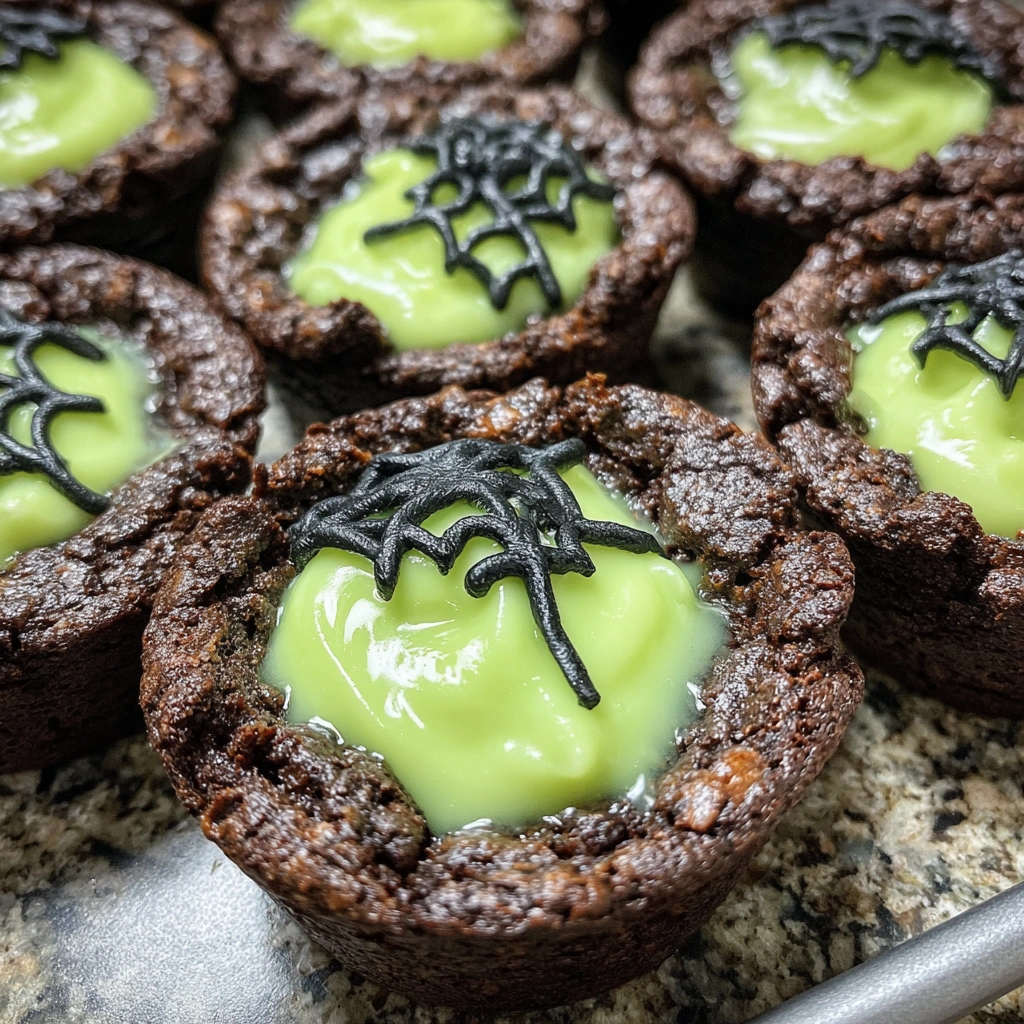
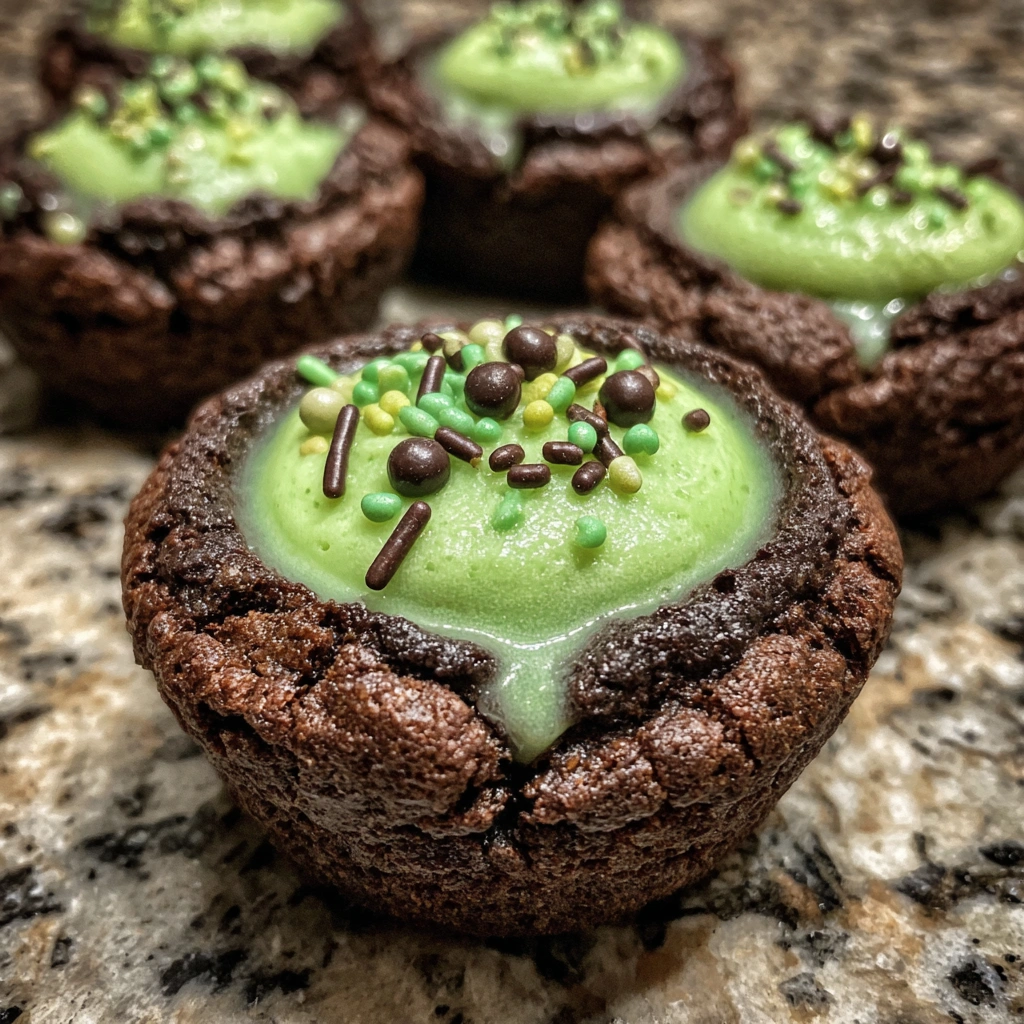
I pipe or spoon green frosting into each cookie cup, filling to resemble bubbling cauldrons. A quick swirl with the spatula edge creates a lively, bubbling effect. The frosting sets into a glossy, magical surface as it cools.
Now for the fun—helmet sprinkles, mini eyeballs, or tiny candies become potion bubbles. I scatter them generously to make each Cauldron Cookie look like a tiny witch’s brew. The kids go wild for the fizz and color.
When all the cups are filled and decorated, I let them settle a moment. A little patience lets the frosting set with fewer smudges. Then we serve, and the kitchen smells like a Halloween night full of treats.
Tips for Success
Quick troubleshooting tips
- If dough is too soft, chill 15 minutes; Cauldron Cookies love a firm base.
- Don’t overfill wells; use about 1 tablespoon dough.
- Bake until edges set; centers stay slightly soft.
- If centers puff or crack, press gently again after baking.
- Check oven temp with a thermometer to avoid surprises.
- Cool cookies in the tin for 5 minutes before removing.
Frosting consistency and piping tips
- For piping, aim a smooth, firm frosting that holds its shape.
- If too loose, add powdered sugar a little at a time.
- If too stiff, whisk in a splash of milk.
- Beat butter until fluffy before adding sugar for best texture.
- Tint frosting after you reach piping consistency to avoid muddy color.
Equipment Needed
I keep a lean, reliable toolkit that makes Cauldron Cookies a breeze.
Essential tools for Cauldron Cookies
- Mini muffin tin (or silicone cups)
- Piping bag or zip-top bag with tip
- Small scoop or rounded teaspoon
- Mixing bowls, measuring cups, and a sturdy wooden spoon
- Cooling rack
Substitutes and handy hacks
- No piping bag? Use a zip-top bag with corner snip.
- Chill dough 15 minutes if too soft.
Variations

Cauldron Cookies shine because they adapt to tastes and diets. Here are twists that keep the magic alive for any crowd.
Dairy-free and gluten-free options
- Use a 1:1 dairy-free butter substitute or melted coconut oil. Chill the dough if it’s soft.
- Choose a gluten-free chocolate cake mix. Look for certified gluten-free on the label.
- For frosting, swap in dairy-free butter and plant milk. Powdered sugar is usually dairy-free; check labels.
- Avoid cross-contact by using clean bowls and utensils; prepare gluten-free dough on a separate surface if needed.
- Decorate with gluten-free sprinkles to prevent hidden gluten from sneaking in.
Flavor twists and color ideas
- Add orange zest or a drop of orange extract for a pumpkin-spice vibe, swapping the mood without changing texture.
- Dial in peppermint or almond extract to deepen chocolate flavor and give a fresh aroma.
- Make a marble frosting by dividing into two colors; swirl green with purple or orange before filling cups.
- Top with Halloween sprinkles, mini eyeballs, or gummy eyes for extra potion vibes.
- Dust with a pinch of cocoa or edible glitter for a moonlit, magical finish.
- For a dairy-free twist, pair dairy-free chocolate cake mix with dairy-free frosting for a seamless Cauldron Cookies experience.
Serving Suggestions
Plating and party presentation
- I plate Cauldron Cookies on a dark tray for a playful party display.
- Add a glow with Halloween sprinkles and a tiny sign so guests know these are Cauldron Cookies.
Pairing ideas for a Halloween spread
- Pair with hot cider, vanilla latte, or spooky punch.
- Set out a mini dessert station with toppings for DIY potions.
Cauldron Cookies Ideas to Elevate Your Halloween Table
Cauldron Cookies can steal the show, but they shine brightest when tucked into a bigger Halloween spread. I love weaving these mini cauldrons into a table that feels warm, playful, and a little mysterious. Pair them with a dark chocolate bark, a green-tinted punch, and witchy signs naming each treat. When everything looks coordinated, guests glide from tray to tray, and the room fills with the scent of chocolate and cinnamon. It’s my go-to approach for easy, crowd-pleasing magic.
Themed tray ideas for spooky gatherings
Here are themed tray ideas that keep Cauldron Cookies at center stage while tying your Halloween table together, so the spread feels coordinated and easy to navigate.
- Potion Tray: Green-frosted Cauldron Cookies with gummy eyeballs and tiny potion-bottle candies.
- Monster Mood Display: Dark chocolate bark with green drizzle and candy eyes for a moody, tasty centerpiece.
- Witch’s Brew Bar: A mini punch station with lime-green drinks and small signs labeling each potion.
Make-ahead planning for parties
Want a calmer party? I plan Cauldron Cookies ahead so the table stays magical, not rushed.
- Bake cookies 1–2 days ahead; cool completely and store airtight.
- Make frosting 1 day ahead; tint green, refrigerate; re-whip before filling.
- Decorate closer to serving time; keep toppings in separate bowls for easy access.
FAQs
Can I make these ahead of time?
Yes. I often bake the cookie cups a day ahead and store them in an airtight container. Let them cool completely, then keep them sealed until you’re ready to frost. Frost close to serving time for the brightest greens and the cleanest, bubbling look.
Can I freeze the dough or baked cookies?
Both work well. Freeze unbaked dough portions in a wrapped disk, then thaw in the fridge and scoop as directed. Bake or reheat frozen cups to refresh edges. You can also freeze fully baked cookies in a airtight container for up to a month and thaw at room temperature before decorating.
How do I tint frosting without muddying the color?
Use gel coloring and add it in small amounts. Tint after you reach piping consistency so the color stays vivid without altering texture. If the color looks muddy, whisk in a touch more powdered sugar or a splash of milk to restore brightness.
Can I adapt Cauldron Cookies for dietary restrictions?
Definitely. Use gluten-free cake mix and a dairy-free butter substitute for dairy-free options. Plant milk works in the frosting too. Be mindful of cross-contact and check labels on sprinkles and colorings.
What makes these cookies extra “cauldron-y” for Halloween parties?
The hollow wells and bubbling green frosting transform each cup into a mini cauldron. Toppings like spooky sprinkles or candy eyeballs add potion bubbles. Pair them with a dark tray and witchy signs for a true Halloween baking ideas moment that guests will remember.
Final Thoughts
As I close the kitchen door on another Halloween night, I’m reminded why Cauldron Cookies matter. They’re more than a treat; they’re a doorway to memory making. I’ve seen tired parents crack a smile as a spoon fills wells, and I’ve heard kids cheer at the bubbling green and the sprinkles. This recipe fits busy weeks and party moments, delivering warmth without fuss. Every bite tastes like a small celebration you can pull off in minutes, turning a chaotic week into a cozy, magical chorus of grateful grins. I hope your kitchen finds that Cauldron Cookies spark.
Print
Cauldron Cookies: 5 Magical, Delicious, Amazing Treats.
- Total Time: 42 minutes
- Yield: 24 mini cookies 1x
- Diet: Vegetarian
Description
Cauldron Cookies are wickedly fun and magically delicious—these Halloween Cauldron Cookies are chocolatey cookie cups filled with bubbling green frosting. A festive treat that’s perfect for spooky parties and little hands to help decorate!
Ingredients
- 1 box chocolate cake mix
- 2 eggs
- ½ cup vegetable oil
- 1 cup unsalted butter, softened
- 3–4 cups powdered sugar
- 2–3 tbsp milk
- ½ tsp vanilla extract
- Green gel food coloring
- Halloween sprinkles or mini candies (optional, for potion bubbles)
Instructions
- Preheat oven to 350°F (175°C). Grease a mini muffin tin.
- In a bowl, combine cake mix, eggs, and oil until a thick dough forms.
- Scoop about 1 tablespoon of dough into each muffin cavity. Press down slightly and create a shallow well using your thumb or the back of a spoon.
- Bake for 10–12 minutes, or until edges are set. As soon as they come out of the oven, gently press the centers again to deepen the well. Let cool in the tin before removing.
- In a large bowl, beat butter until fluffy. Gradually add powdered sugar, vanilla, and milk until smooth and pipeable.
- Tint the frosting green with gel food coloring.
- Pipe or spoon green frosting into each cookie cup to resemble bubbling cauldrons.
- Decorate with Halloween sprinkles, mini eyeballs, or small candies to create potion bubbles.
Notes
- Yield: 24 mini cookies.
- Let frosting set before serving to prevent smudges.
- For a thicker frosting, add more powdered sugar; add a splash of milk to reach piping consistency.
- Store in an airtight container at room temperature for 2–3 days.
- Chill dough for 15–20 minutes for easier handling if it’s too soft.
- Prep Time: 15 minutes
- Cook Time: 12 minutes
- Category: Dessert
- Method: Baking
- Cuisine: American
Nutrition
- Serving Size: 1 mini cookie
- Calories: 125
- Sugar: 12 g
- Sodium: 75 mg
- Fat: 8 g
- Saturated Fat: 5 g
- Unsaturated Fat: 3 g
- Trans Fat: 0 g
- Carbohydrates: 16 g
- Fiber: 0 g
- Protein: 2 g
- Cholesterol: 18 mg
Keywords: Cauldron Cookies, Halloween Cauldron Cookies, halloween baking ideas, Halloween treats, spooky cookies