Marshmallow Rice Krispies Halloween is the snack I reach for when the clock is ticking and the house buzzes with spooky energy. I’m a professional chef guiding Cook by Cook, and I’m a busy mom at heart who believes in quick, joyful cooking that fits a packed schedule.
My kitchen philosophy is simple: turn pantry staples into playful treats that bring the family together without bogging you down. These brain-shaped, no-bake bites use familiar ingredients and a dash of Halloween drama to create a centerpiece that kids adore and adults admire. With a glossy red drizzle, they look delightfully ghastly, yet come together in under an hour—leaving you time for movie night, costume deadlines, and the season’s hustle.
Table of Contents
what make this Marshmallow Rice Krispies Halloween special
Marshmallow Rice Krispies Halloween is my go-to when the clock ticks and the house buzzes. I’m a busy home cook who loves quick wins and keeps meals fun.
This no-bake treat fits a hectic calendar while still feeling special and proudly festive. The brain-shaped bites use familiar pantry staples, a glossy red drizzle, and Halloween drama.
They’re simple enough for kids to help with, yet fancy enough to impress friends and family. Plus, cleanup is a breeze, so you get more time for movie nights and memories.
These bites travel well, perfect for school lunches or potlucks. That glossy red drizzle makes them look professional enough for Halloween dessert spreads.
Why You’ll Love This Marshmallow Rice Krispies Halloween
I love a treat that’s ready before the clock hits zero.
This Marshmallow Rice Krispies Halloween magic fits a busy day and still feels special.
Easy steps keep me sane on hectic afternoons.
Crunchy cereal, chewy marshmallow, and a glossy red drizzle deliver big Halloween impact without a big fuss.
Quick, foolproof steps with big Halloween impact (Marshmallow Rice Krispies Halloween)
These steps are made to be fast, forgiving, and fun for the whole family.
- Melt butter and marshmallows together until glossy and smooth.
- Stir in vanilla, then fold in Rice Krispies until the mixture gleams.
- Shape the warm mix into brain-like rounds on parchment; smooth the tops for a skull-free finish.
- Melt red candy melts and drizzle over the brains; let them set before serving.
Ingredients Marshmallow Rice Krispies Halloween
For this Marshmallow Rice Krispies Halloween, I lean on simple pantry stars. Puff Rice cereal, unsalted butter, mini marshmallows, vanilla extract, and red drizzle are key. For gluten-free options, use certified gluten-free Rice Krispies and check candy melts.
If dairy is an issue, swap in dairy-free butter and vegan marshmallows. A pinch of salt wakes sweetness, and red gel icing works in Marshmallow Rice Krispies Halloween. Exact measurements appear at the bottom of the article for easy printing.
Ingredient overview for Marshmallow Rice Krispies Halloween
Think of these ingredients as your Halloween toolbox: crunch, bind, fluff, and color.
The secret is balance between crisp cereal and gooey marshmallows, crowned with a bloody drizzle.
How to Make Marshmallow Rice Krispies Halloween
Marshmallow Rice Krispies Halloween Step 1: Melt Butter and Marshmallows
I start with a cozy, no-fuss setup. I set a large, heavy-bottomed pot on the stove over low heat. The goal is slow, gentle warmth—no burnt edges, just glossy marshmallow goodness. I melt the butter first, letting it shimmer like a caramel sunrise. Then I add the mini marshmallows, stirring with a silicone spatula. They melt into a creamy, silky pool. If you rush, you’ll get clumps; patience gives you that flawless, smooth base for the brain bites.
Here’s where the magic happens: I keep the heat low and stir often. The mixture should stay glossy, not grainy. Once the marshmallows are fully melted, I take the pot off the heat briefly and whisk in a splash of vanilla. It wakes the sweetness and makes the whole kitchen smell like a Halloween-honeyed dream. Remember, this is Marshmallow Rice Krispies Halloween at its heart—simple, comforting, and a little bit magical.
Tips I keep handy for smooth sailing:
- Use unsalted butter for a clean, balanced flavor that doesn’t compete with the vanilla.
- If some marshmallows resist, a quick 10-second return to the low flame will coax them back to smoothness.
- Stay close and stir often. The bottom can brown in an instant, and we want even-toasted sweetness, not scorched edges.
With the butter and marshmallow harmony in place, I’m ready to bring in the cereal in Step 2. The stage is set for those brainy bites to take shape.
Marshmallow Rice Krispies Halloween Step 2: Stir in Vanilla and Cereal
Now the clock is ticking and the glitter of Halloween is calling. I pour in the vanilla and then quickly fold in the Rice Krispies, one generous handful at a time. The cereal drinks up the melted marshmallow like a sponge; it’s soft, sticky, and wonderfully sticky in a comforting, nostalgic way. I fold until every puffed grain is coated—a glistening, pale battlefield where crunch meets chew.
The key here is speed and gentle folding. If you linger, the mixture can cool too much and become hard to shape. I keep a steady rhythm, turning the spoon in wide, swooping arcs so the cereal doesn’t clump. If your kitchen is warmer, you may find the mixture stays pliable a touch longer; if it’s cooler, you might need to give it a few more turns until everything is evenly coated and ready for molding.
Practical tips for this step:
- Work quickly but calmly; the aim is to coat every piece evenly while the mixture is still warm.
- If you’re doing this with kids, let them sprinkle in a few spoonfuls and watch the magic unfold—great for Halloween bonding.
- For a touch of saltiness that sharpens sweetness, add a pinch of salt to the mix before folding in the cereal.
Once the coating is glossy and even, I move to shaping. The brains are coming to life, and Step 3 will bring them into view.
Marshmallow Rice Krispies Halloween Step 3: Shape Brain-Like Mounds
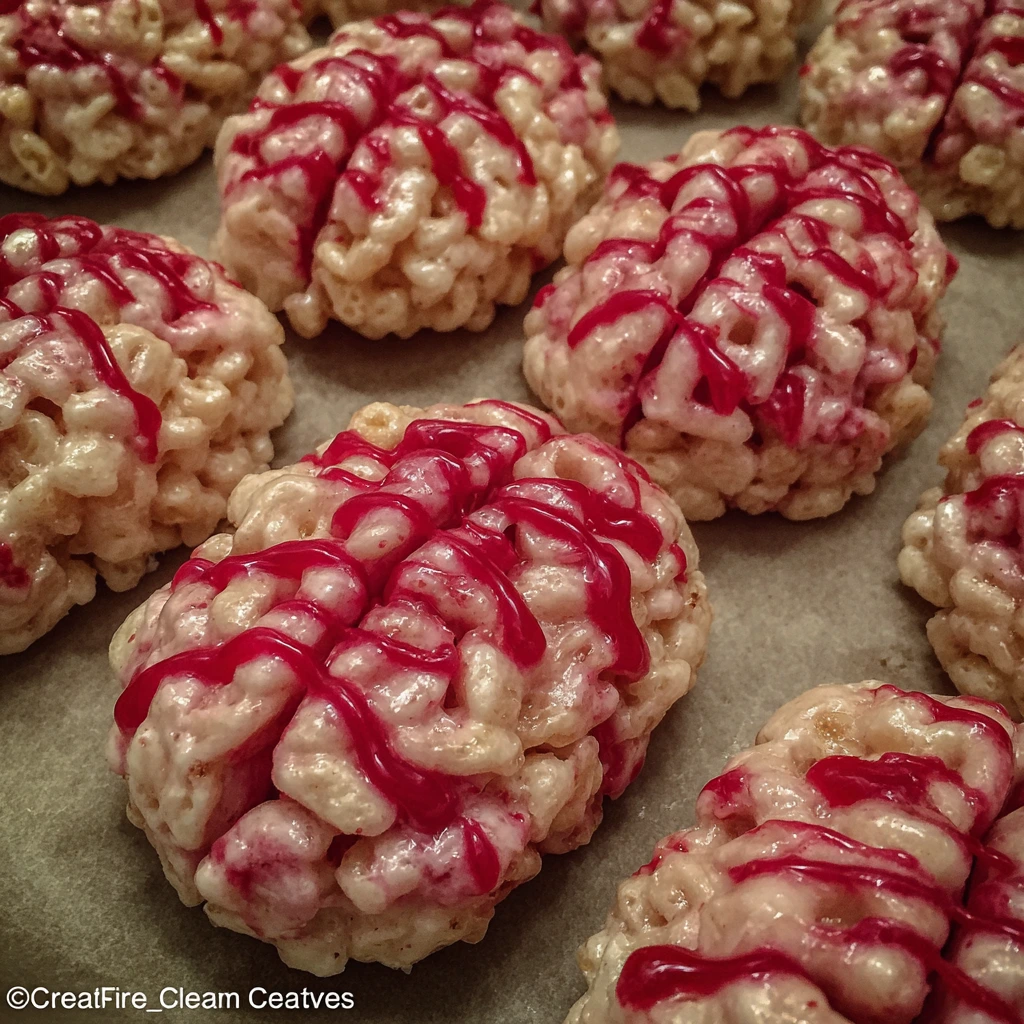
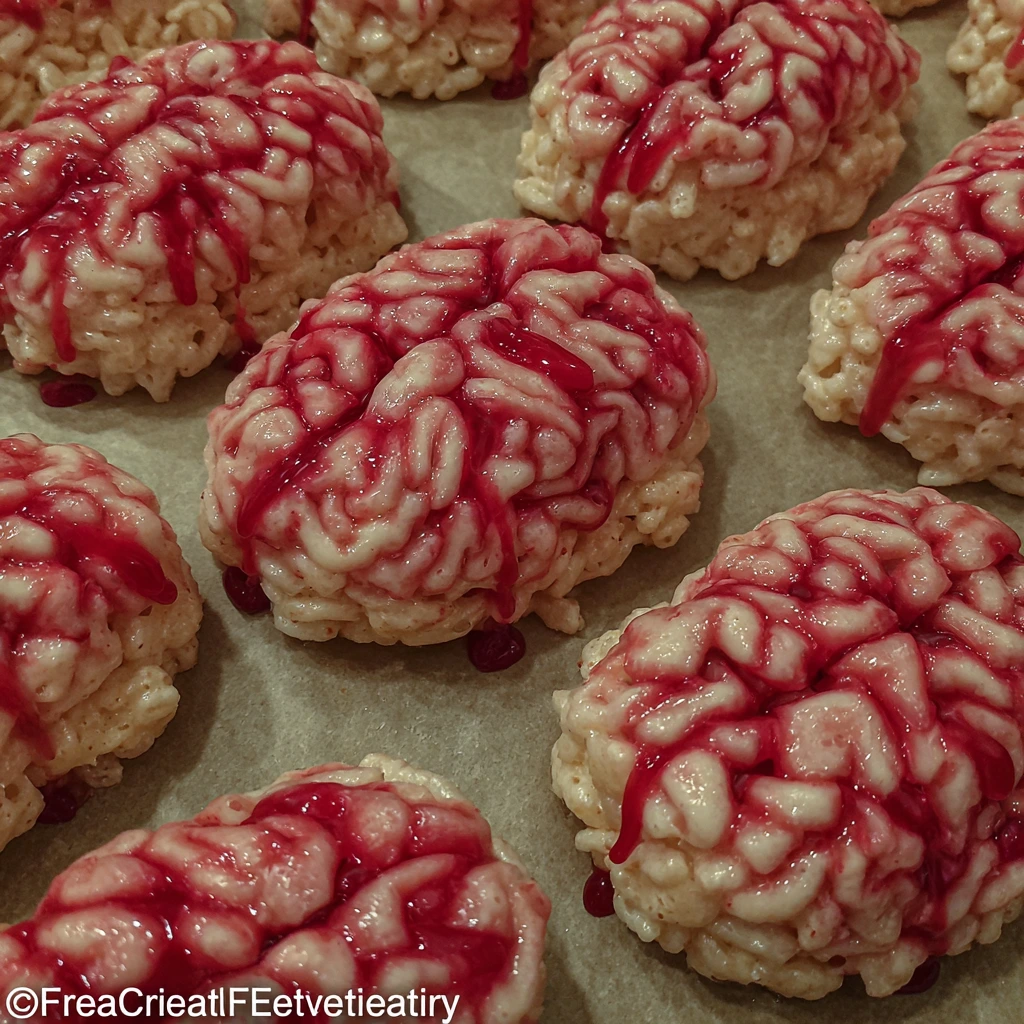
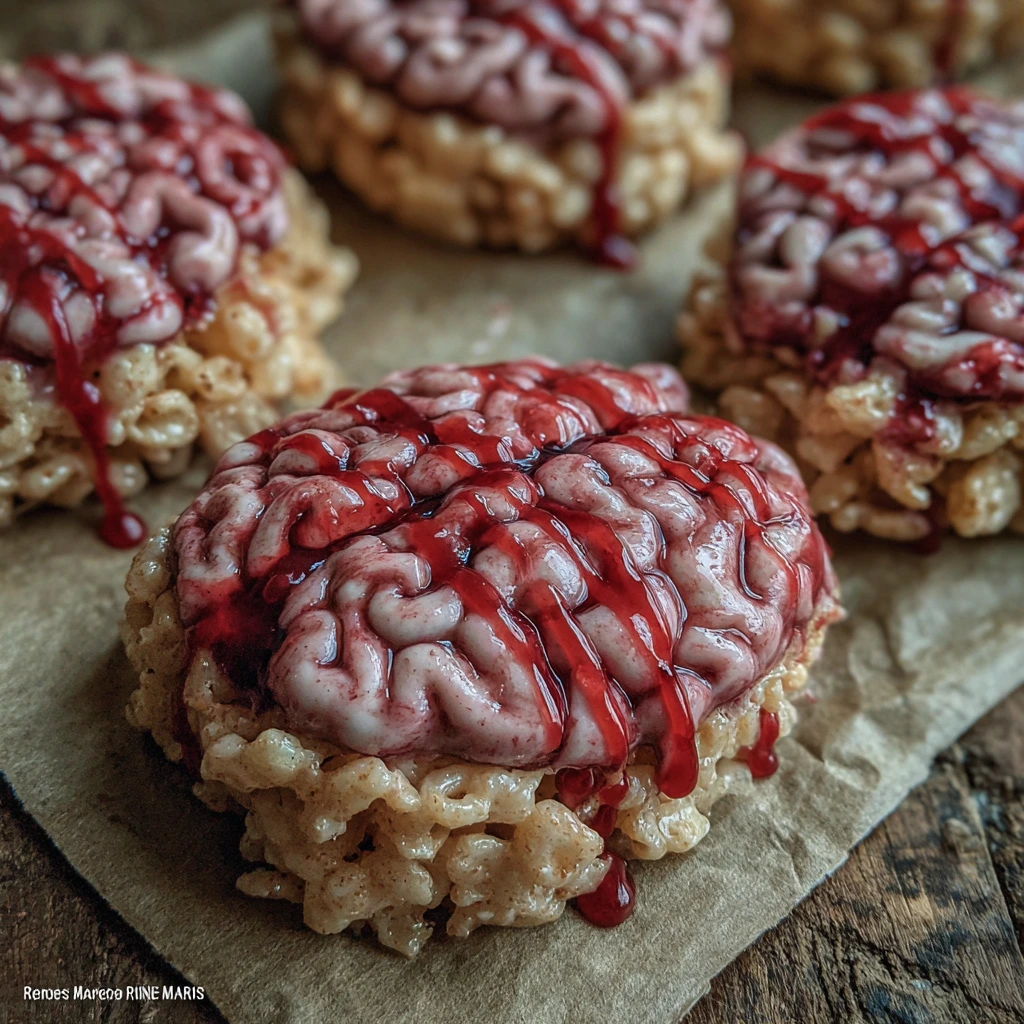
Here’s where the fun truly begins. I scoop a handful of the warm, sticky mixture and press it into a rounded mound on a parchment-lined tray. I don’t want perfect spheres; I want brain-like forms—organic, a little uneven, with natural creases that read as “brains” from a friendly distance. I shape each mound with the tip of my fingers, smoothing the top just enough to give a clean surface for the drizzle to cling to.
While shaping, I think about texture and memory. The softness of the marshmallow mingle with the crunch of cereal is a childhood carnival in every bite. If you’re aiming for a more brainy look, you can lightly press the mixture into a shallow dish and then score ridges with the back of a butter knife to mimic brain grooves. The ridges catch the light, making the bites look delightfully ghastly when the drizzle lands.
Tips to keep this step flowing smoothly:
- Work when the mix is warm. If it cools too much, microwaving in 5- to 10-second bursts can soften it again.
- Keep a damp towel nearby to wipe fingertips. Sticky fingers slow you down and ruin the shapes.
- Aim for roughly 1- to 1.5-inch brain shapes; uniform size helps the presentation look intentional and professional.
As the tray fills with eerie little brains, I’m almost ready for the signature red drizzle that makes this Marshmallow Rice Krispies Halloween treat pop on any party table. Step 4 will give them their bloodied, spooky finish.
Marshmallow Rice Krispies Halloween Step 4: Drizzle with Blood
Time to add the drama. I melt red candy melts according to the package, stirring until they’re silky and ready to pour. If you don’t have candy melts, a bright red gel icing works beautifully too; it just behaves a bit differently as it dries. I test a tiny drizzle on a parchment corner to judge flow and color, then go full-on Halloween with a slow, graceful drizzle across each brain.
Drizzling is an art of patience. I hold the spoon high enough to create a thin line, then glide it in a few back-and-forth passes to suggest veins. If you’re in a hurry, a toothpick can pull the color into delicate lines for a scarier effect. Be mindful not to oversaturate any one brain; a few glossy streaks are plenty to say “blood” without turning the treats into a candy melt mess.
For aroma and texture harmony, I sometimes dab a tiny amount of the same red drizzle along the sides of the ridges to accentuate the brainlike grooves. It’s a small touch, but it pays off in photos and memories alike.
Helpful hints for this step:
- Work on a clean sheet of parchment to keep the drizzle from seeping into the surface and making a mess.
- If the drizzle thickens, rewarm it briefly in short bursts rather than letting it thicken at room temp.
- For dairy-free readers, use vegan candy melts or a berry-red gel icing to achieve a similar effect.
With the drizzle settled and gleaming, the brain bites are almost set. The final stretch is about patience and a quick set in Step 5. If you’re in a rush, a brief chill can speed up the finish without compromising texture.
Marshmallow Rice Krispies Halloween Step 5: Set and Plate (optional finishing tips)
The last act is a quiet pause. I let the brains rest on the parchment at room temperature for about 10 to 15 minutes. This allows the marshmallow to firm up just enough for easy lifting and clean bites. If you’re packaging them for a treat box, a brief chill in the fridge speeds up setting and makes stacking simpler. I keep an eye on the surface—when the drizzle is set and the mounds hold their shape, they’re ready for the spotlight.
Presentation matters as much as taste. I arrange the brains on a platter in a loose cluster, letting the red drizzle thread across a few of them to create a focal point. A light dusting of edible shimmer or a few candy spiders on the side can elevate a Halloween dessert spread without adding workload. These Marshmallow Rice Krispies Halloween brains look festive, feel fun, and taste comforting enough to win over picky eaters and busy grownups alike.
Storage note: if you’re not serving right away, keep the tray covered at room temperature. They stay soft and chewy for hours, though they set best within 15 minutes of cooling. If you need to transport them, slide the brains onto a sturdy tray and cover tightly to preserve their shape and shine.
Tips for Success
- Prep in advance: measure and line trays before you start.
- Keep the heat low so Marshmallow Rice Krispies Halloween stay glossy.
- Work fast when folding in cereal; warm mix coats evenly.
- Have parchment handy and damp fingertips to prevent sticking.
- Drizzle last for a crisp, dramatic finish without soggy brains.
- If needed, use gluten-free or dairy-free swaps from the notes.
- Trust your senses; taste a tiny bit early to balance sweetness.
Equipment Needed
- Heavy-bottom pot for even heat
- Silicone spatula for smooth melting
- Parchment-lined tray or silicone mat
- Mixing bowls and measuring cups/spoons
- Microwave-safe bowl for candy melts
- Flat spatula or spoon for shaping
- Cooling rack or extra tray for setting
- Optional food thermometer to check temps
Variations
- Gluten-free and dairy-free Marshmallow Rice Krispies Halloween brains: I swap in certified gluten-free Rice Krispies and dairy-free butter (or coconut oil) plus vegan marshmallows. If candy melts aren’t available, I use red gel icing for the finishing drizzle.
- Chocolatey Marshmallow Rice Krispies Halloween brains: I whisk in 1–2 tablespoons unsweetened cocoa powder with the melted marshmallows before folding in the cereal for a rich, cocoa-brain vibe. Finish with a red drizzle for gore.
- Peanut butter swirl twist: I stir in 1–2 tablespoons creamy peanut or almond butter into the warm marshmallow mix for a creamy, nutty bite.
- Color play for extra drama: I split the batch and tint portions with a drop of green or orange food coloring to create brains in Halloween hues.
- Molded brains for uniformity: I press the warm mixture into a silicone brain mold or mini muffin tin. A quick chill helps them hold their shape when you plate them.
- Spooky texture and finishing touches: I add candy eyes or white chocolate veins and lightly score ridges before the drizzle for a more dramatic, photo-worthy brain.
Serving Suggestions
- Serve on a spooky dessert board with edible glitter and candy spiders for photo-worthy drama.
- Pair with apple cider or cherry punch to echo the red drizzle.
- Use small tongs and bat napkins for easy, kid-friendly serving.
- Bundle 2–3 brains per clear bag for party favors.
More Marshmallow Rice Krispies Halloween Brain Ideas for a Spooky Table
I love turning these brains into a centerpiece for a spooky table. Marshmallow Rice Krispies Halloween brains are a quick canvas for color, texture, and Halloween desserts that don’t steal your evening.

Treat the mix like playdough by using a silicone brain mold or mini muffin tin for uniform shapes. Marshmallow Rice Krispies Halloween brains respond to molds, making presentation look professional without extra effort.
Want variety? Add a touch of cocoa powder for gray matter, swirl in peanut butter, or pipe white chocolate veins for a gore-free kind of drama. A few drops of green or orange gel coloring can transform the batch into themed brains without losing the marshmallow charm.
Top with candy eyes, edible glitter, or a delicate sugar dusting to catch the light on a dessert board. Serve with spiced apple cider or warm caramel for a full Halloween-desserts moment that’s kid-friendly and crowd-pleasing.
If you’re plating for a party, assemble brains ahead, then drizzle last to keep the red blood show shiny. These tweaks keep the Marshmallow Rice Krispies Halloween table lively and inviting, with plenty of room for your personal touch.
FAQs about Marshmallow Rice Krispies Halloween
What is Marshmallow Rice Krispies Halloween, and how does it work as brains?
Marshmallow Rice Krispies Halloween is a playful brain treat made without baking.
I use familiar pantry stars to shape chewy brain bites with a dramatic red drizzle.
It’s a no-fuss method perfect for busy days and a fun addition to Halloween desserts and Halloween recipes ideas.
Can I make this gluten-free or dairy-free?
Yes. You can make it gluten-free or dairy-free with simple swaps.
Use certified gluten-free Rice Krispies, dairy-free butter, and vegan marshmallows. If you can’t find red candy melts, red gel icing is a great stand-in.
These swaps keep Marshmallow Rice Krispies Halloween friendly for families with dietary needs.
Always check labels on candy melts for dairy-free status.
How should I store these brain treats, and how long do they keep?
Store these brain treats in an airtight container at room temperature for several hours.
They stay soft and chewy best within 15 minutes of cooling; refrigerate to extend freshness if needed.
Can I drizzle with something other than red candy melts?
Drizzle options aren’t limited to red candy melts.
Try tinted white chocolate, pink gel, or dark chocolate for contrast. You can also skip the drizzle for a milder Halloween dessert.
Final Thoughts on Marshmallow Rice Krispies Halloween
This Marshmallow Rice Krispies Halloween moment is a reminder that simple treats spark the biggest smiles.
I love how cereal and marshmallows become something memorable with a little red drizzle.
These brains are playful yet comforting, perfect for busy evenings and picky eaters.
They set up a mini Halloween moment on the table and in photos.
Best of all, they come together in under an hour.
That means I can bake, snap pics, and still be present.
As a busy chef, I appreciate meals that travel well.
These brains ship nicely to parties or school lunches, no fuss.
I love when kids declare them the spookiest treats of the season.
With a few tweaks, this Marshmallow Rice Krispies Halloween becomes your family’s favorite.
Marshmallow Rice Krispies Halloween 12 Easy Spooky Yummy.
- Total Time: 30 minutes
- Yield: ~12 brains
- Diet: Vegetarian
Description
Marshmallow Rice Krispies Halloween brain treats: Creepy, chewy Rice Krispies bites shaped like brains, finished with a red drizzle for a gory Halloween touch.
Ingredients
- 6 cups Rice Krispies cereal (or similar puffed rice cereal)
- 4 tbsp unsalted butter
- 1 package (10 oz) mini marshmallows
- ½ tsp vanilla extract
- Red candy melts or red gel icing (for ‘blood’ drizzle)
Instructions
- In a large pot, melt butter over low heat. Add marshmallows and stir until fully melted and smooth.
- Stir in vanilla extract, then quickly fold in Rice Krispies cereal until fully coated.
- While still warm, scoop handfuls of the mixture and shape them into rounded, brain-like forms.
- Place on a parchment-lined tray and let cool for 10–15 minutes to firm up.
- Melt red candy melts according to package instructions, then drizzle over the brains to create a spooky, gory effect.
- Let set before serving or packaging.
Notes
- Store in an airtight container at room temperature; they set best within 15 minutes but can be refrigerated to speed up setting.
- If you don’t have red candy melts, use red gel icing for a similar effect.
- For a more brain-like texture, you can lightly press the mixture into a shallow dish and score ridges before shaping into brain forms.
- To make gluten-free, use certified gluten-free Rice Krispies.
- Prep Time: 10 minutes
- Cook Time: 5 minutes
- Category: Dessert
- Method: No-Bake
- Cuisine: American
Nutrition
- Serving Size: 1 brain
- Calories: 110
- Sugar: 9 g
- Sodium: 70 mg
- Fat: 4 g
- Saturated Fat: 2 g
- Unsaturated Fat: 2 g
- Trans Fat: 0 g
- Carbohydrates: 22 g
- Fiber: 0 g
- Protein: 2 g
- Cholesterol: 120 mg
Keywords: Marshmallow Rice Krispies Halloween, Marshmallow Rice Krispies Halloween Brains, Halloween Brains, Halloween recipes ideas, Halloween desserts